Jill Seidner is an educated & experienced Interior Designer based in Los Angeles. She has over three decades of experience in the design industry. Jill graduated from the UCLA Interior & Environmental Design Program and has worked for several top designers in Los Angeles. In 2006, she established her own design firm, Jill Seidner Interior Design. Jill specializes in commercial and residential interior design services, design consultations, & online design services. In 2025, she launched Design By Subscribe - a membership platform for accessible interior design. Jill has a passion for traveling and has visited over thirty countries, including time spent living in Europe. She has also taken an interest in house sitting and travel sitting, with over forty sits to date. This experience has provided her with a real-life glimpse into how design functions in people’s homes, which she applies to her skills in design and remodeling. Jill comes from a family involved in the design and building industry. In third grade, she expressed her desire to be an interior designer, inspired by her mother. https://yourdesignguide.design.blog/
Last year, a client contacted us about renovating her 1920s Spanish Revival home in San Pedro, California. The house still retains much of its original architecture, and our objective was to renovate it with respect for its integrity while also modernizing it.
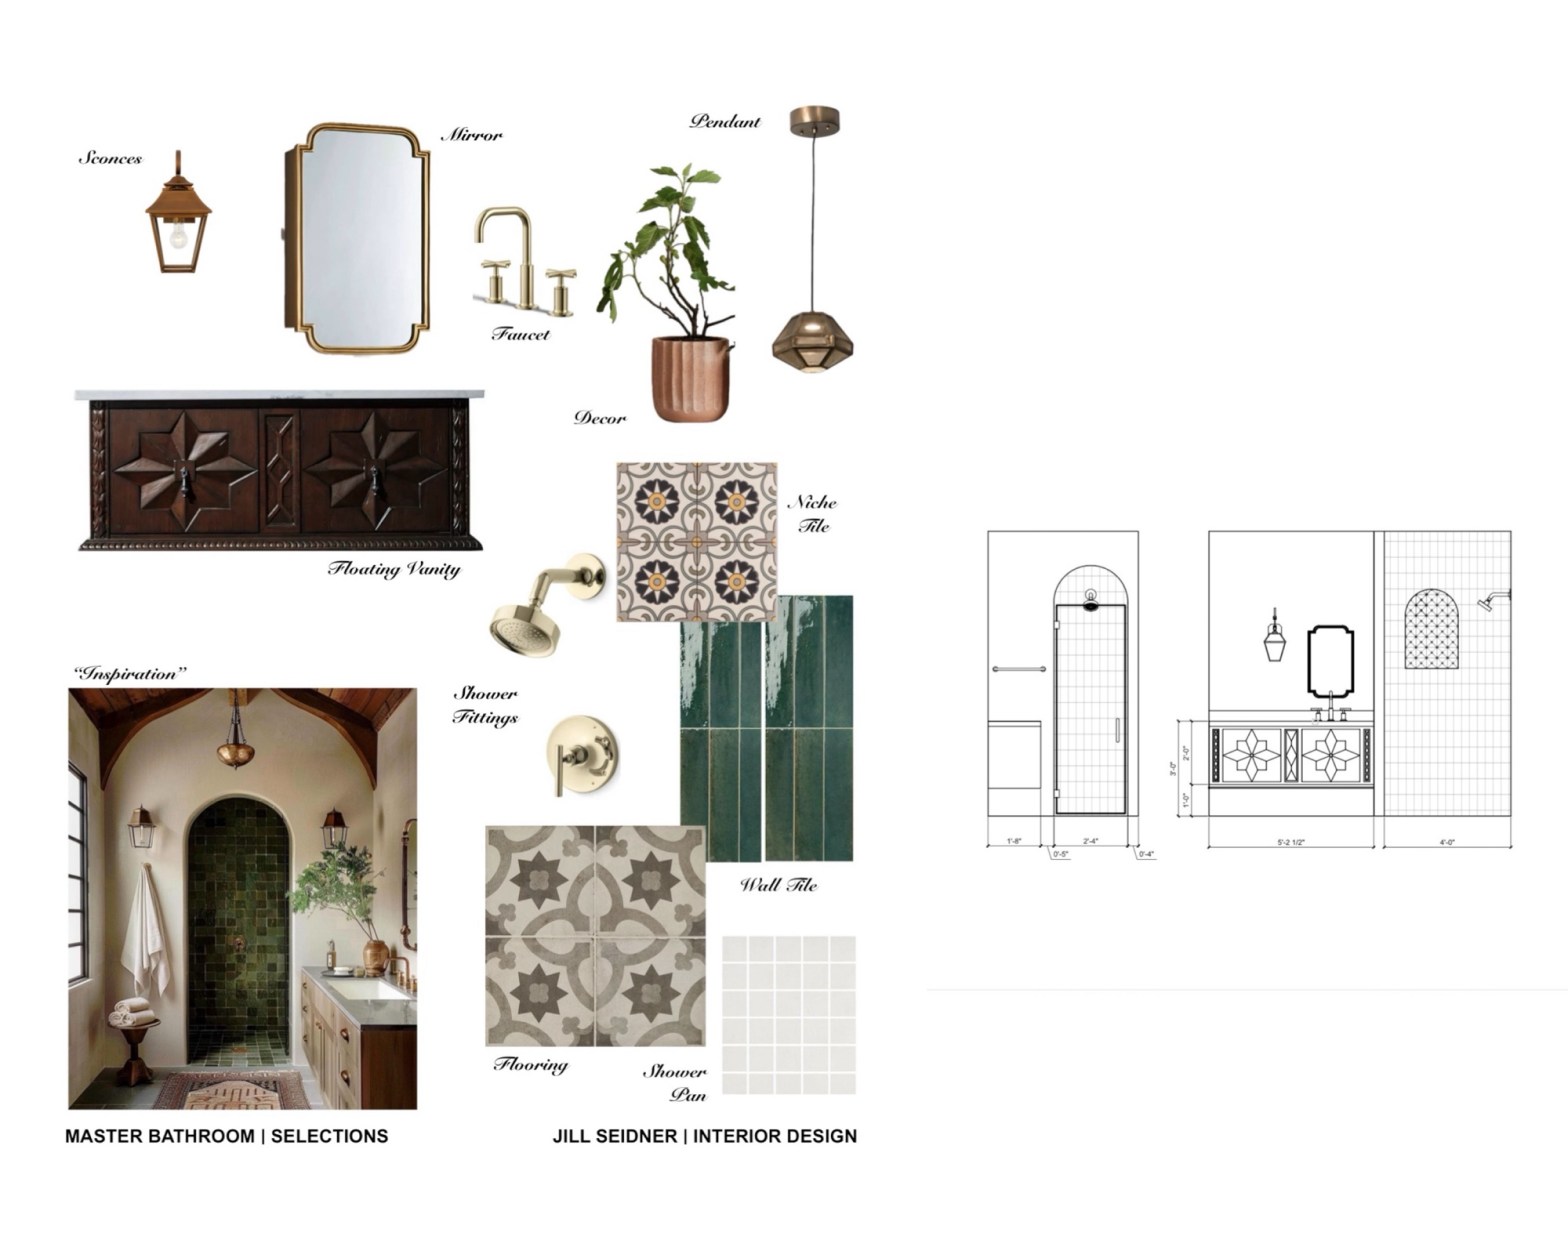
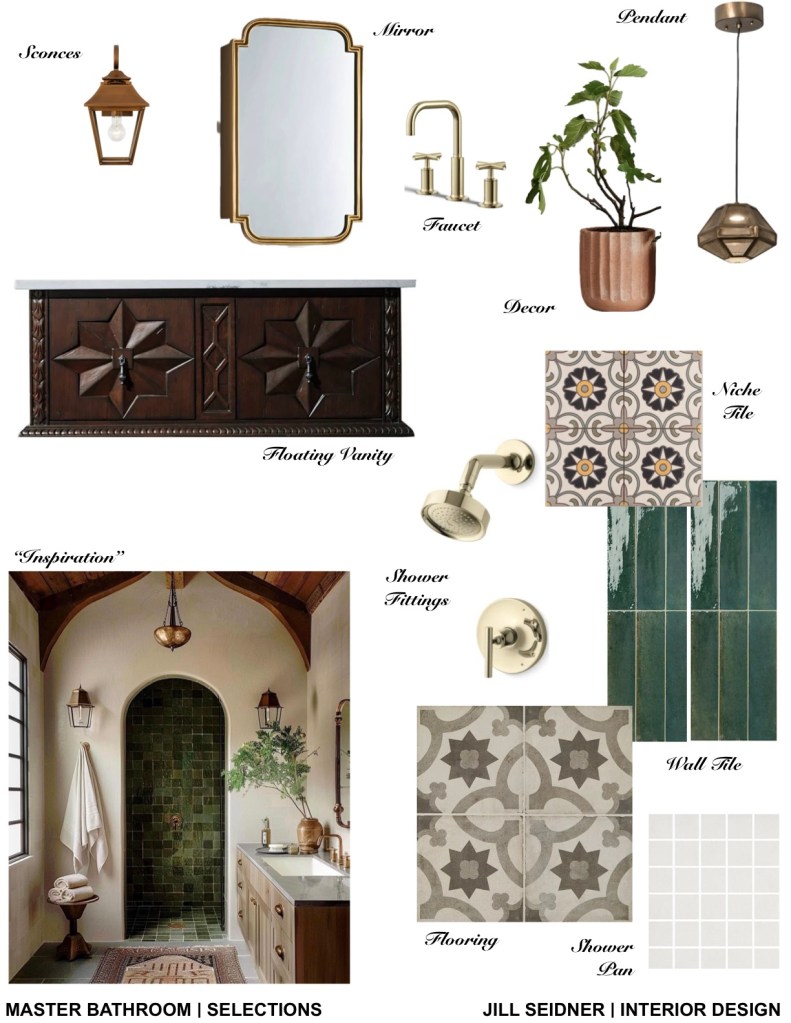
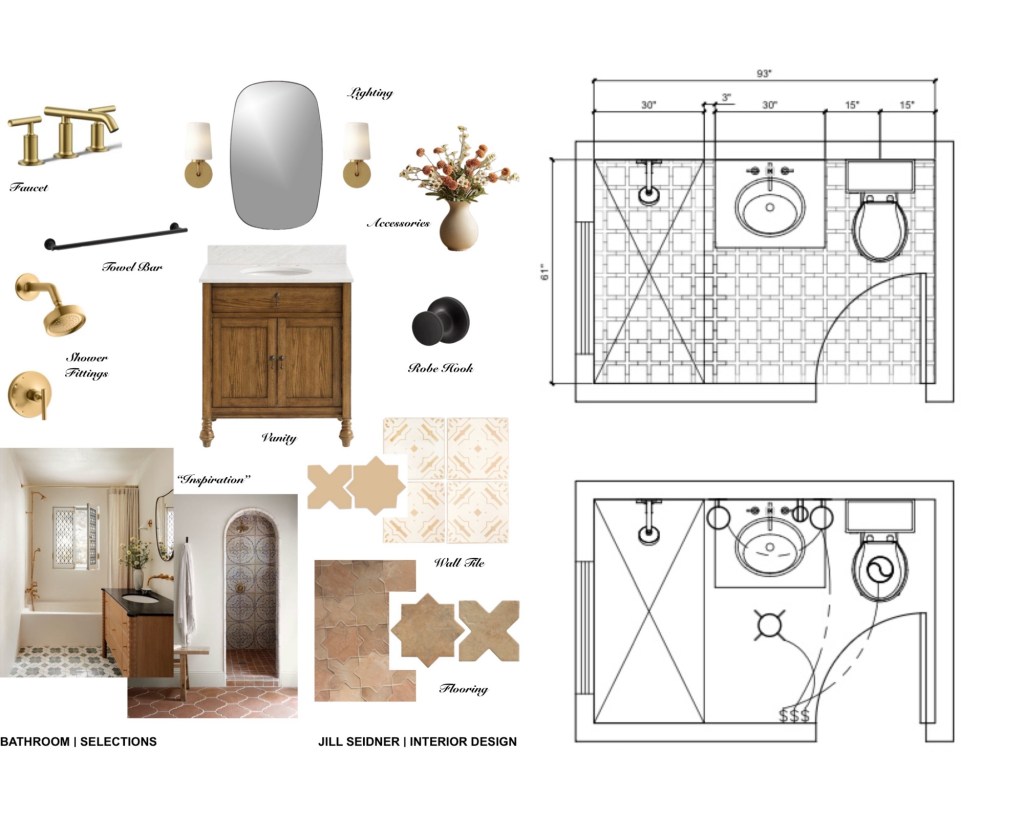
One of the first designs I worked on, was a tiny bathroom off the master bedroom. We needed to accommodate a larger vanity and extend the shower into a neighboring closet.
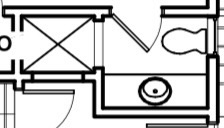
The basic house drawing plan started like this:
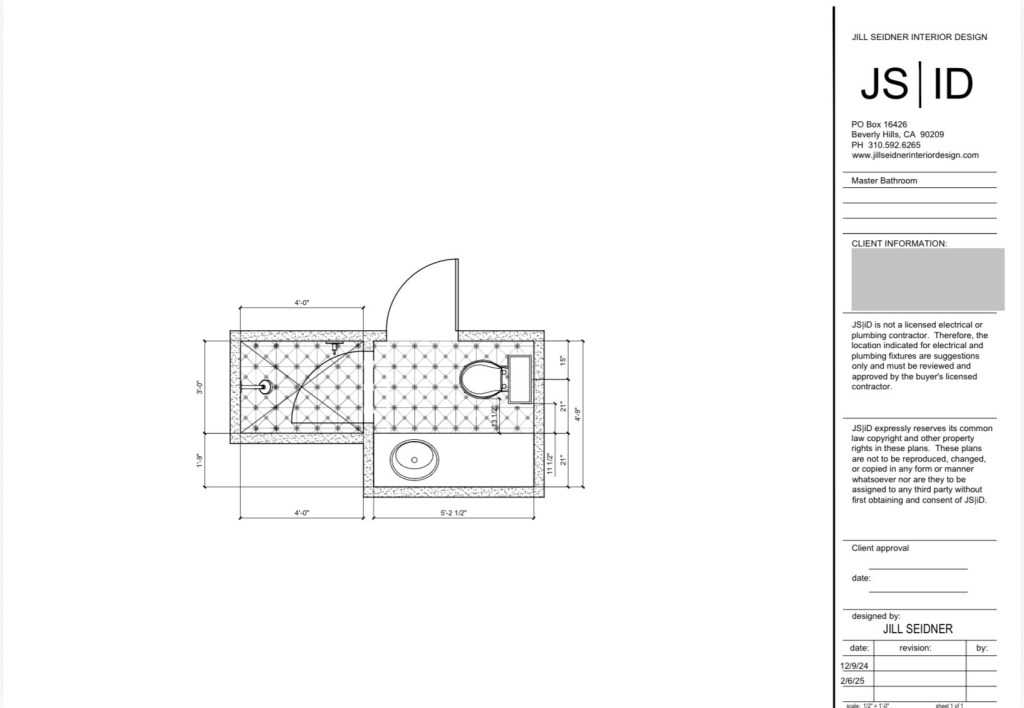
Because it was a very tight distance between the sink at the vanity and the toilet, I suggested off-centering the sink, so there is more space when standing at the vanity. The new floor plan showcases a larger shower that went into an existing closet and the off-centered sink creating more usable countertop space.
New proposed detailed floor plan with tile layout.
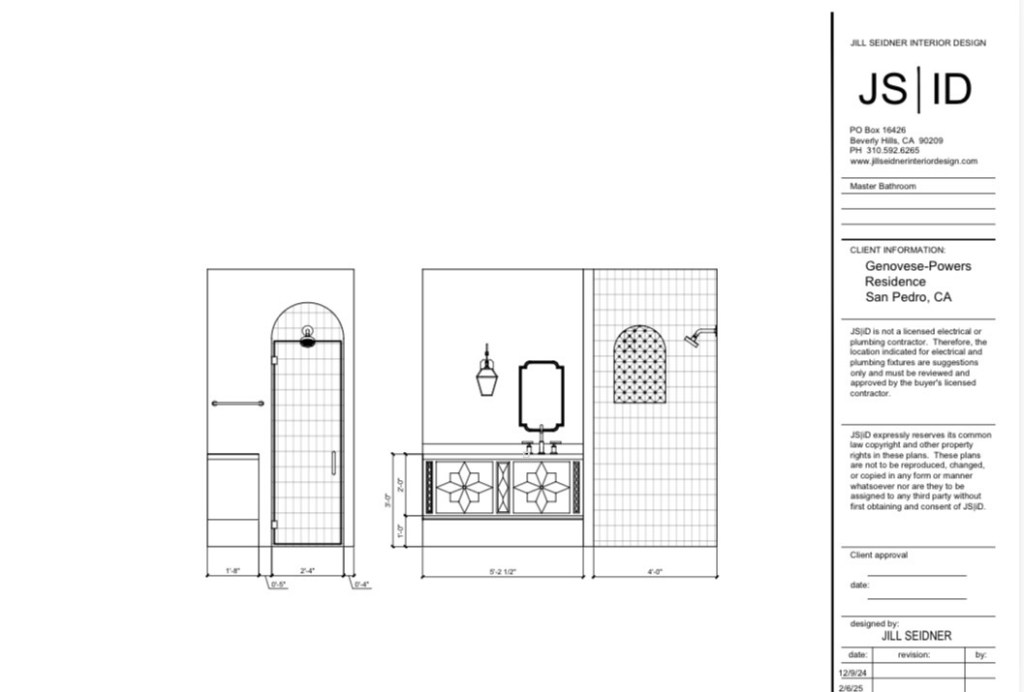
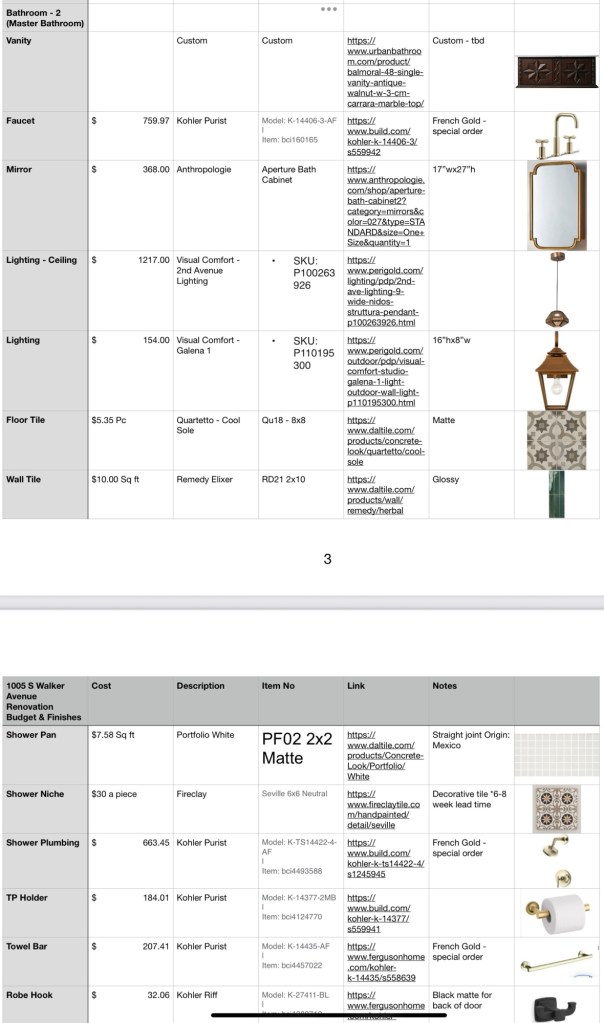
For the vanity design, the client found a vanity style she liked and I replicated it to create a custom floating vanity. We incorporated a mirror that complements the Spanish Revival style and a lantern for sconces inspired by a concept photo I had suggested.
Elevation drawing with vanity design & tile layout.
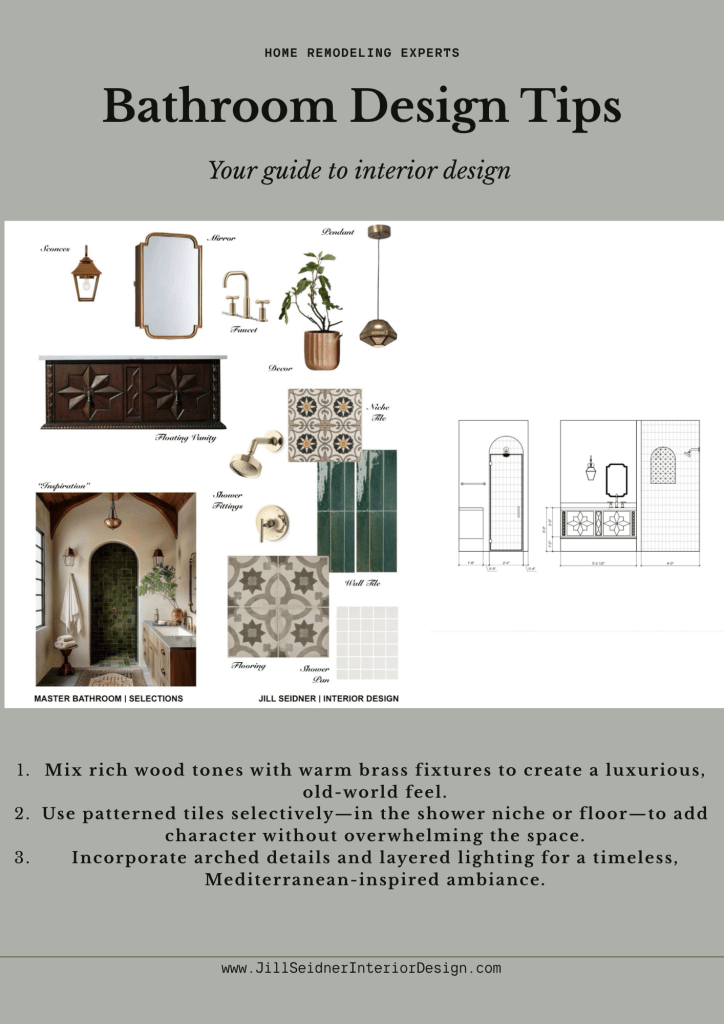
For the finish selections, I created a concept board inspired by a photo and incorporated color and concrete tiles with a pattern to compliment the Spanish style to make this small bathroom truly stand out.
Selections concept board. Here are some design tips inspired by this bathroom design:
Color Combination Suggestion: Mix rich wood tones.
Fixture Color: Warm brass.
Desired Atmosphere: Luxurious and old-world.
Tile Usage Recommendation: Use patterned tiles selectively.
Suggested Locations: Shower niche or floor.
Design Benefit: Add character without overwhelming the space.
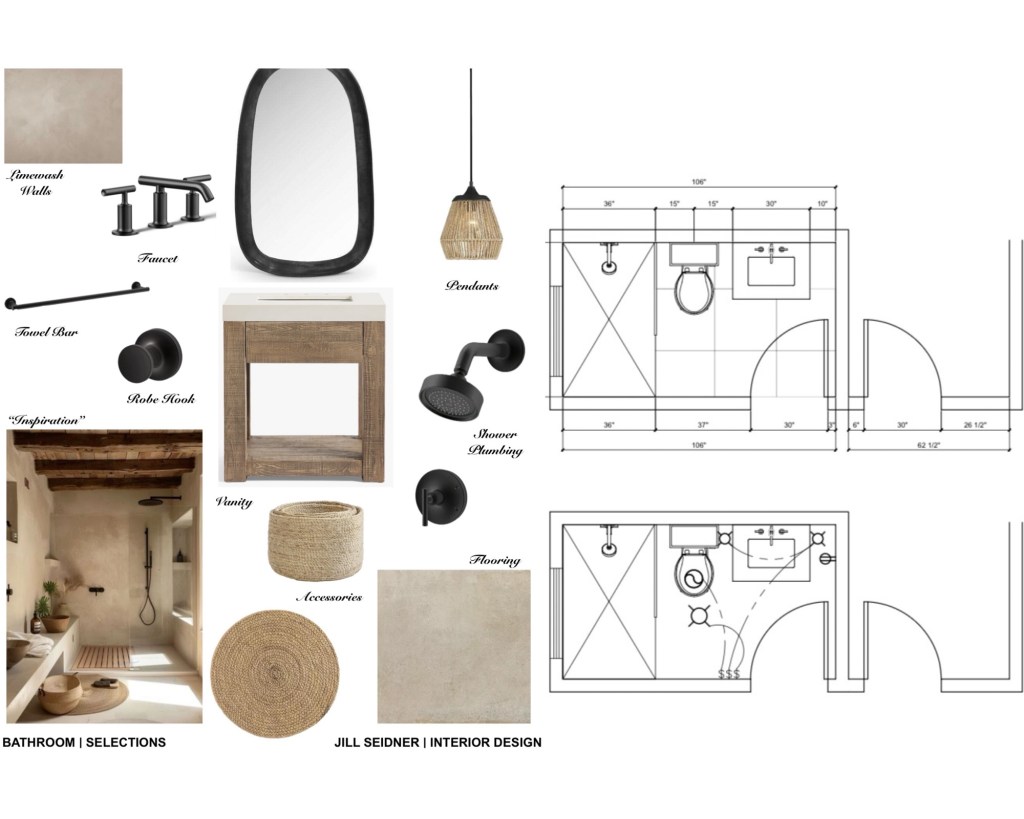
For the last year, I’ve been working on a home renovation project for a beautiful 1920’s Spanish Revival in San Pedro, CA.
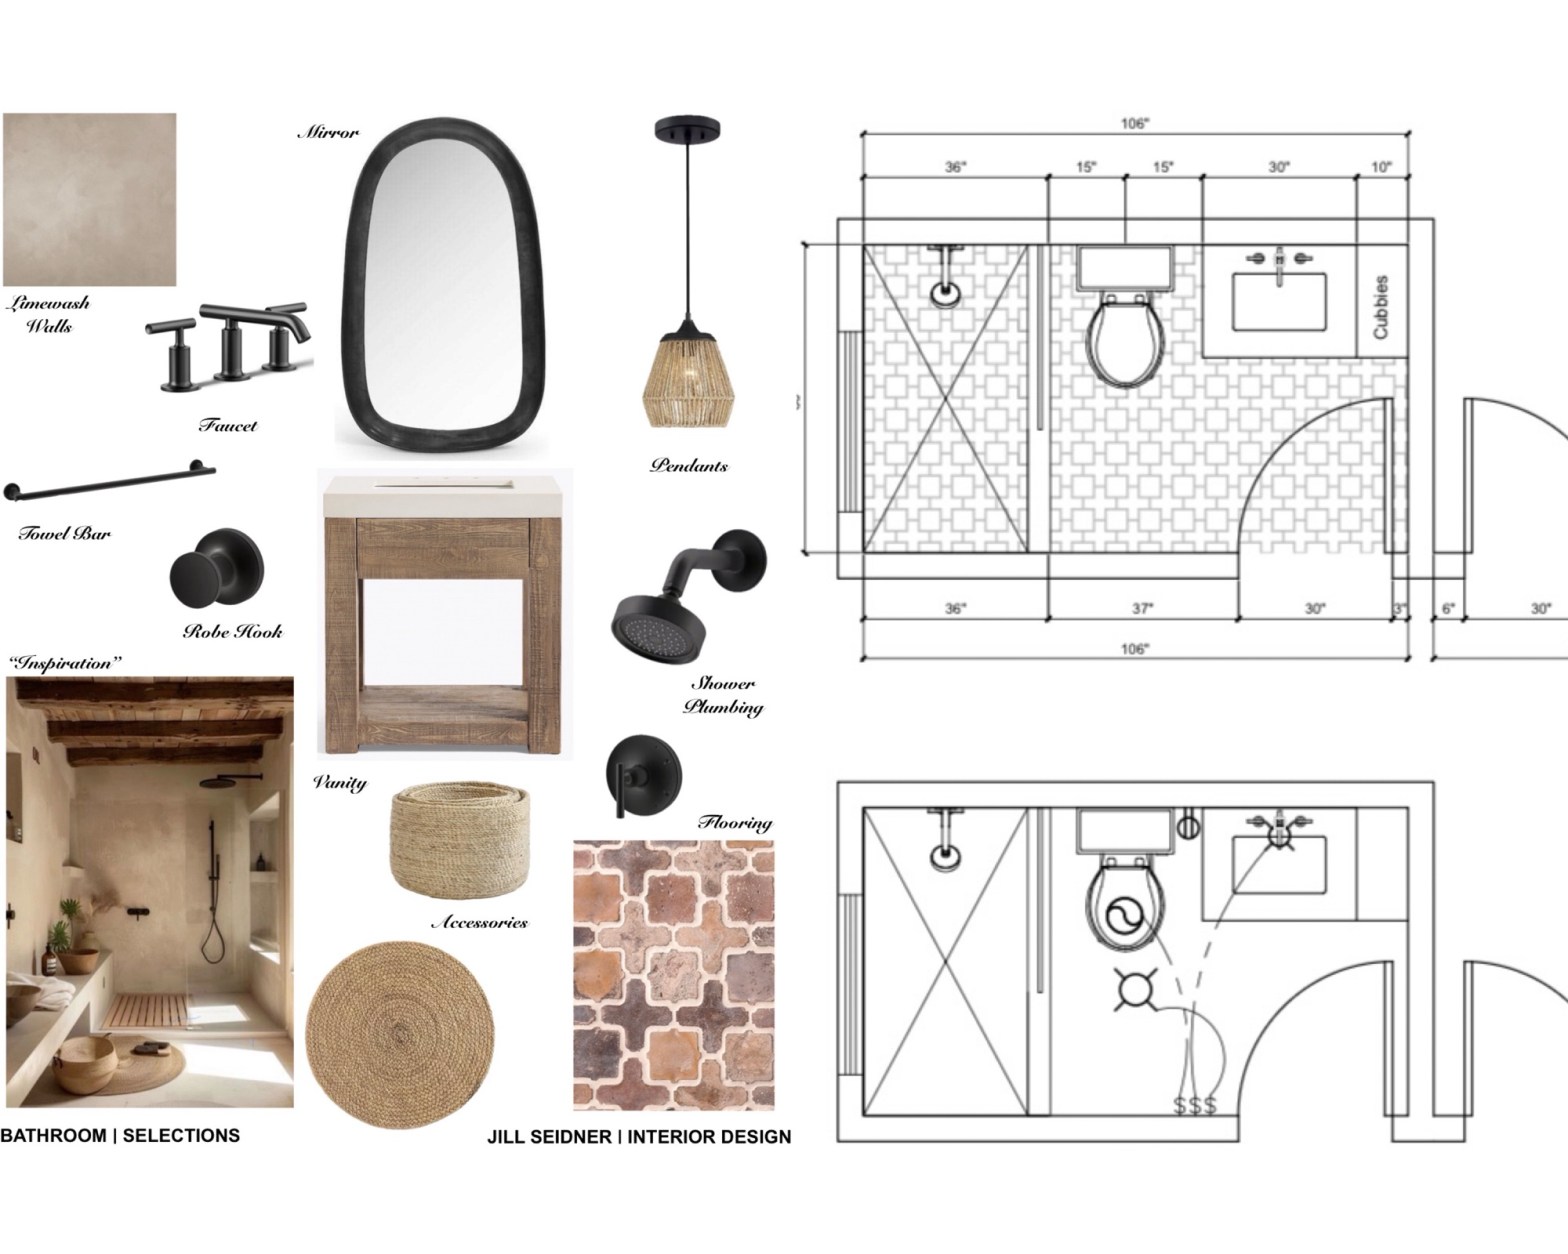
Much of the design planning had started late at the end of last year and into the beginning of this year. While construction has still been going on, my client emailed me in June, wanting to completely redesign one of the bathrooms we had long finalized.
It’s a small bathroom in a downstairs basement area. The original idea is that it would retain the Spanish style look that is consistent with the rest of the house and architecture, but also be a bathroom for her husband with some slightly more masculine touches (matte black hardware).
Per her input and inspiration photos, we re-designed the bathroom from the original take on a contemporary Spanish style to a more on-trend natural style.
Here’s a look at one bathroom, two ways:
Overall Style:
Modern Spanish influence with a mix of traditional and contemporary elements
Warm, earthy tones with rustic textures
Key Fixtures & Finishes:
Vanity:
Warm wood finish with classic legs and cabinet storage
Marble countertop
Faucet & Shower Fittings:
Brushed brass/gold finish
Clean-lined, modern profiles
Mirror & Lighting:
Rounded-edge mirror for a soft modern look
Brass wall sconces flanking the mirror
Towel Bar & Robe Hook:
Matte black finish for contrast
Simplistic, functional hardware
Tile Selections:
Flooring:
Spanish-style terracotta tiles
Mix of solid and patterned shapes (cross/star shapes)
Wall Tile:
Delicate cream and tan patterned tile
Soft and subtle design to enhance the Spanish feel
Layout:
Efficient, rectangular layout
Shower, vanity, and toilet arranged along the long wall
Entry door swings inward with clear circulation path
Built-in niche or shelving in shower area
Accessories:
Neutral-toned ceramic vase with dried florals
Accent decor to add warmth and texture
Inspirational Images:
Arched doorway with statement tile inlay
Wood vanity with bold black countertop and soft neutral backdrop
Vintage-inspired but clean and modern execution
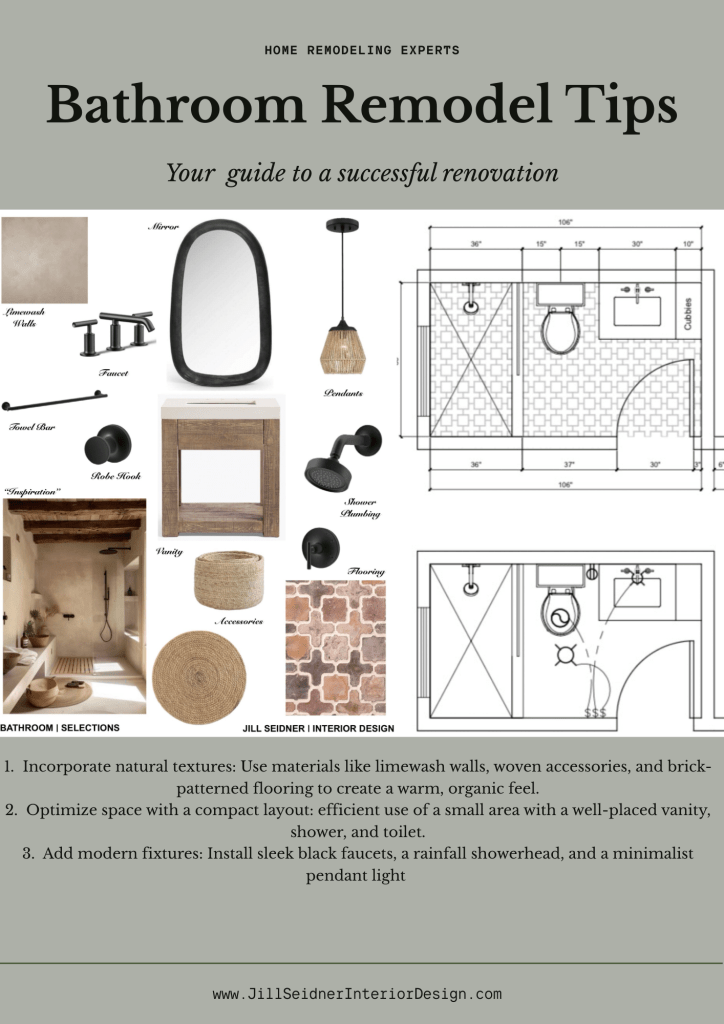
Overall Style:
Earthy, organic modern aesthetic
Inspired by natural textures and neutral tones
Features limewashed walls for a soft, matte, old-world feel
Minimalist yet warm and grounded
Key Fixtures & Finishes:
Vanity:
Rustic wood with open shelf base
Simple white sink integrated into top
Mirror:
Irregular organic shape in a matte black frame
Faucet & Shower Plumbing:
Matte black fixtures for modern contrast
Clean-lined, contemporary silhouettes
Lighting:
Woven pendant light—adds texture and natural fiber
Hardware:
Matte black towel bar and robe hook for cohesion
Tile & Surfaces:
Walls:
Soft limewash finish in warm beige tone
Flooring
Warm mix of earthy browns and dusty tones
Organic shapes with a rustic layout
Accessories:
Woven seagrass baskets
Round natural fiber mat
Decor that adds texture and emphasizes the neutral palette
Layout Highlights:
Rectangular bathroom layout
Separate shower with glass door
Toilet centered between shower and vanity
Additional cubbies or shelving for storage near the vanity
Inspiration Image:
Spa-like minimalism
Built-in ledge for seating and display
Streamlined and cohesive neutral palette
We were also able to widen the existing bathroom into the adjacent laundry room (not reflected on the first plan).
For those of you who have ever done a home remodeling project, I feel your pain. While the outcome is often rewarding, the process can be long and daunting. A great deal of decision-making and hoping not to make costly mistakes.
As an interior designer, not only is it my job to design and collaborate with the client, but I also experience what it’s like through the remodeling projects vicariously.
My biggest advice is never to rush. Thoughtful planning, time to think through decisions, plenty of time for purchasing, and all the mishaps that happen (long lead times, broken / lost items, ….oh so many things!). And plan for contingencies… things always seem to take longer and end up being more expensive, unfortunately.
I’m looking forward to featuring the process of some of my projects here, as well as welcoming the opportunity to take your submissions and provide feedback on your projects as well. If you are interested in design or remodeling advice, I have included information here about submitting your project for design advice.
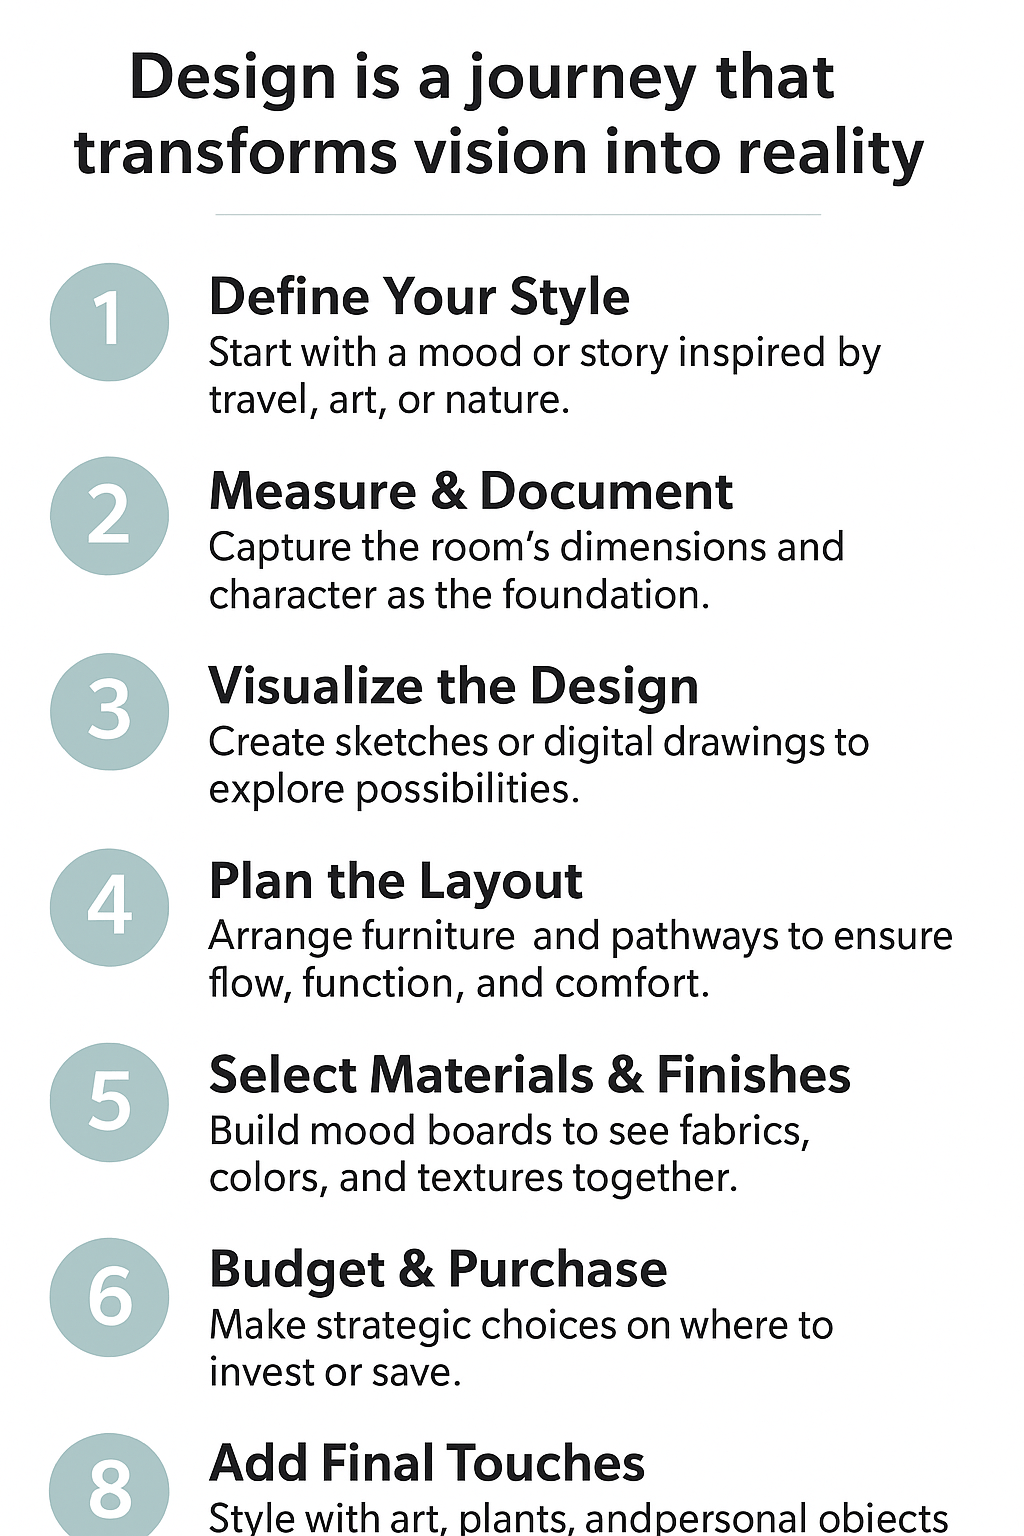
Here’s my typical step by step process for approaching design projects:
Step 1: Concepts – Defining a Style
Every beautiful room begins with a vision. Think of this step as writing the story of your space—what mood do you want it to evoke? Is it calm and serene, bold and dramatic, or timeless and classic? Gathering inspiration from travel, nature, art, or your favorite interiors helps create a design style that feels authentic to you.
Step 2: Measure & Photo
Even dream spaces need a foundation. By capturing measurements and photos, you’re not just collecting numbers—you’re honoring the architecture and character that already exists. These details become the canvas for your creativity, giving you the freedom to dream while staying grounded in what’s possible.
Step 3: Design Drawings
This is where vision takes shape. Rough sketches or digital drawings allow you to imagine how the space could look once transformed. It’s a moment of possibility—lines on paper that hold the promise of comfort, beauty, and function.
Step 4: Space Planning & Layout Development
Design isn’t just about how things look—it’s about how a space feels when you move through it. In this step, the room becomes a choreography of furniture, pathways, and light. A thoughtful layout makes a space flow effortlessly, where every corner has a purpose and every view feels intentional.
Step 5: Selections & Presentation Boards
Now the soul of the design comes alive. Fabrics, finishes, colors, and textures tell the story you began in Step 1. Mood boards let you see it all together—the shimmer of metal, the softness of textiles, the warmth of wood. It’s the moment when your ideas start to feel real, almost touchable.
Step 6: Budget & Purchasing
Even creativity needs structure. A well-planned budget gives you freedom to dream without worry. This step is about making thoughtful choices—deciding where to invest in timeless pieces, and where to save with smart finds. Purchasing becomes the act of turning vision into reality, piece by piece.
Step 7: Hiring Professionals
Behind every stunning interior is a team who brings it to life. From skilled contractors to artisans and tradespeople, these professionals help transform your vision with precision. Choosing the right team is less about transactions and more about collaboration—a shared commitment to beauty and quality.
Step 8: Final Touches
The magic happens here. A room becomes more than walls and furniture when you add art, books, plants, and objects that tell your story. These finishing touches create atmosphere, warmth, and personality. They whisper who you are, turning a designed space into a lived-in sanctuary.
Conclusion
Design is not a straight line—it’s a journey of discovery. From the spark of an idea to the final styling, each step reveals a piece of the story your home wants to tell. When complete, the result isn’t just a beautiful space—it’s a reflection of your life, your taste, and the moments you want to create within it.
After over three decades in the interior design industry, I have decided to embark on a new journey of writing about design. My goal is to share insights into the design process, provide practical guides, offer valuable tips, ideas, and resources, and assist readers online with their design projects. Therefore, I’ve create “Your Design Guide” – especially catered to you.
Before we dive into projects and your projects, here are some fun facts about my background:
I first decided I wanted to be “a interior disger” like my mom when I was in the 3rd grade.
I’ve been drawing flooring plans since I was little and before that I created rooms out of play-doh.
I attended both UCLA for Interior & Environmental Design and Otis for Design as part of my interior design education.
I worked in both commercial & residential interior design, often freelancing for many high-end interior designers (celebrity clients) before embarking on my own in 2006.
I’ve been in business for myself since 2006, mostly residential interior design projects but also some commercial design projects.
Around 2007, I was invited to join the Material Girls Blog as the Los Angeles blogger. At that time, I had barely heard of blogs, but it sounded like a great idea!
Blogging and social media grew and I feel grateful to have been a part of that community in the early days. I learned a lot, met a lot of great people, socialized with our local design community, and many opportunities came from it.
In addition to full service design I offer, I have also long been doing online interior design, or some say “e-design” or “e-decorating. From these services, I now offer several flat rate online design services.